

I’ve built Halloween skeletons for yards, porches, stages, and school halls. I know what holds up in wind, what breaks, and what looks real at night. In this guide, I’ll show you how to make a skeleton for Halloween with easy steps, simple tools, and budget tips. You’ll learn how to plan the pose, build a sturdy frame, craft convincing bones, and finish it with eerie detail. By the end, you’ll have a durable prop that looks store-bought but costs far less.

Materials Checklist
Before you start, decide on size, budget, and where you will display it. Then gather parts that fit the plan. Here is a proven set that works for most builds.
- For the frame: PVC pipe, PVC elbows and tees, or thick garden wire. These set the shape and keep the skeleton stable.
- For bones: foam board, cardboard, EVA foam, or lightweight wood. For hands and ribs, foam and cardboard work best.
- For joints: zip ties, paracord, small bolts with lock nuts, or wire. These let parts move and hold a pose.
- For surface detail: air-dry clay or paper mache paste. This adds shape to the skull and joints.
- For finish: white or bone spray paint, gray and brown acrylics, matte sealer. These create a bone look with depth.
- For extras: cheesecloth, gauze, hot glue, plastic wrap, LED puck lights, fishing line. These add texture and spooky lighting.
- Tools: hand saw for PVC, utility knife, hot glue gun, drill, marker, ruler, safety gloves, and mask.
Safety note: Work in a ventilated space, use gloves, and wear eye protection. For kids, swap sharp tools for blunt craft tools and supervise.
Plan Your Skeleton Size And Pose
Good planning saves time and mistakes. Choose a standard height, like 5.5 to 6 feet, for a human look. Mark a simple stick figure on paper and note bone lengths.
- Head and torso height: about half the full height. Legs make up the other half.
- Shoulders: as wide as the skull plus a bit. This avoids a narrow cartoon look.
- Pose ideas: sitting on a porch, climbing a fence, leaning on a tombstone, or waving from a window.
- Indoor vs outdoor: for yards, use stronger joints and a ground stake.
Pro tip from my builds: plan three contact points with the ground or wall. It keeps the skeleton stable in wind.

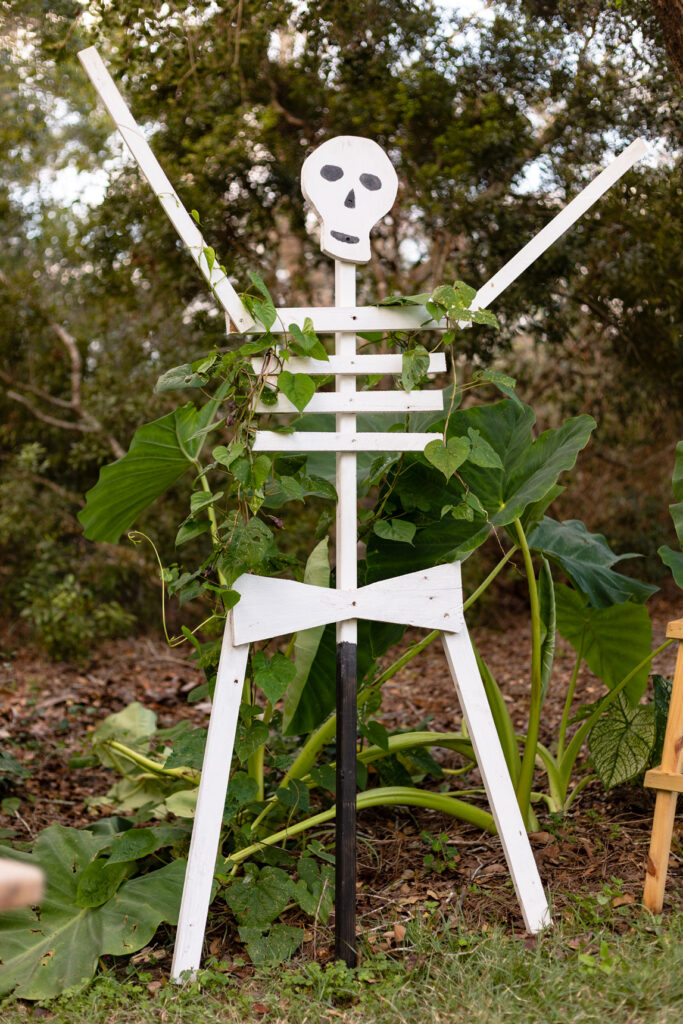
Build The Frame
The frame is the backbone. PVC pipe is light, cheap, and strong. Wire works for small skeletons or hanging props.
- PVC frame steps: cut a spine, two legs, two arms, and a neck. Use tees at hips and shoulders. Use elbows for knees and elbows.
- Dry-fit parts first. Mark angles with a marker so you can re-align after paint.
- Add a base: a short PVC “T” at the pelvis that slips over a rebar stake or a wood base.
- Wire frame steps: twist two lengths for the spine and add branches for limbs. Wrap joints tight, then tape for safety.
Tip: I drill small pilot holes through elbows and tees and add zip ties as “pins.” This stops wobble without glue, so you can still pose it.

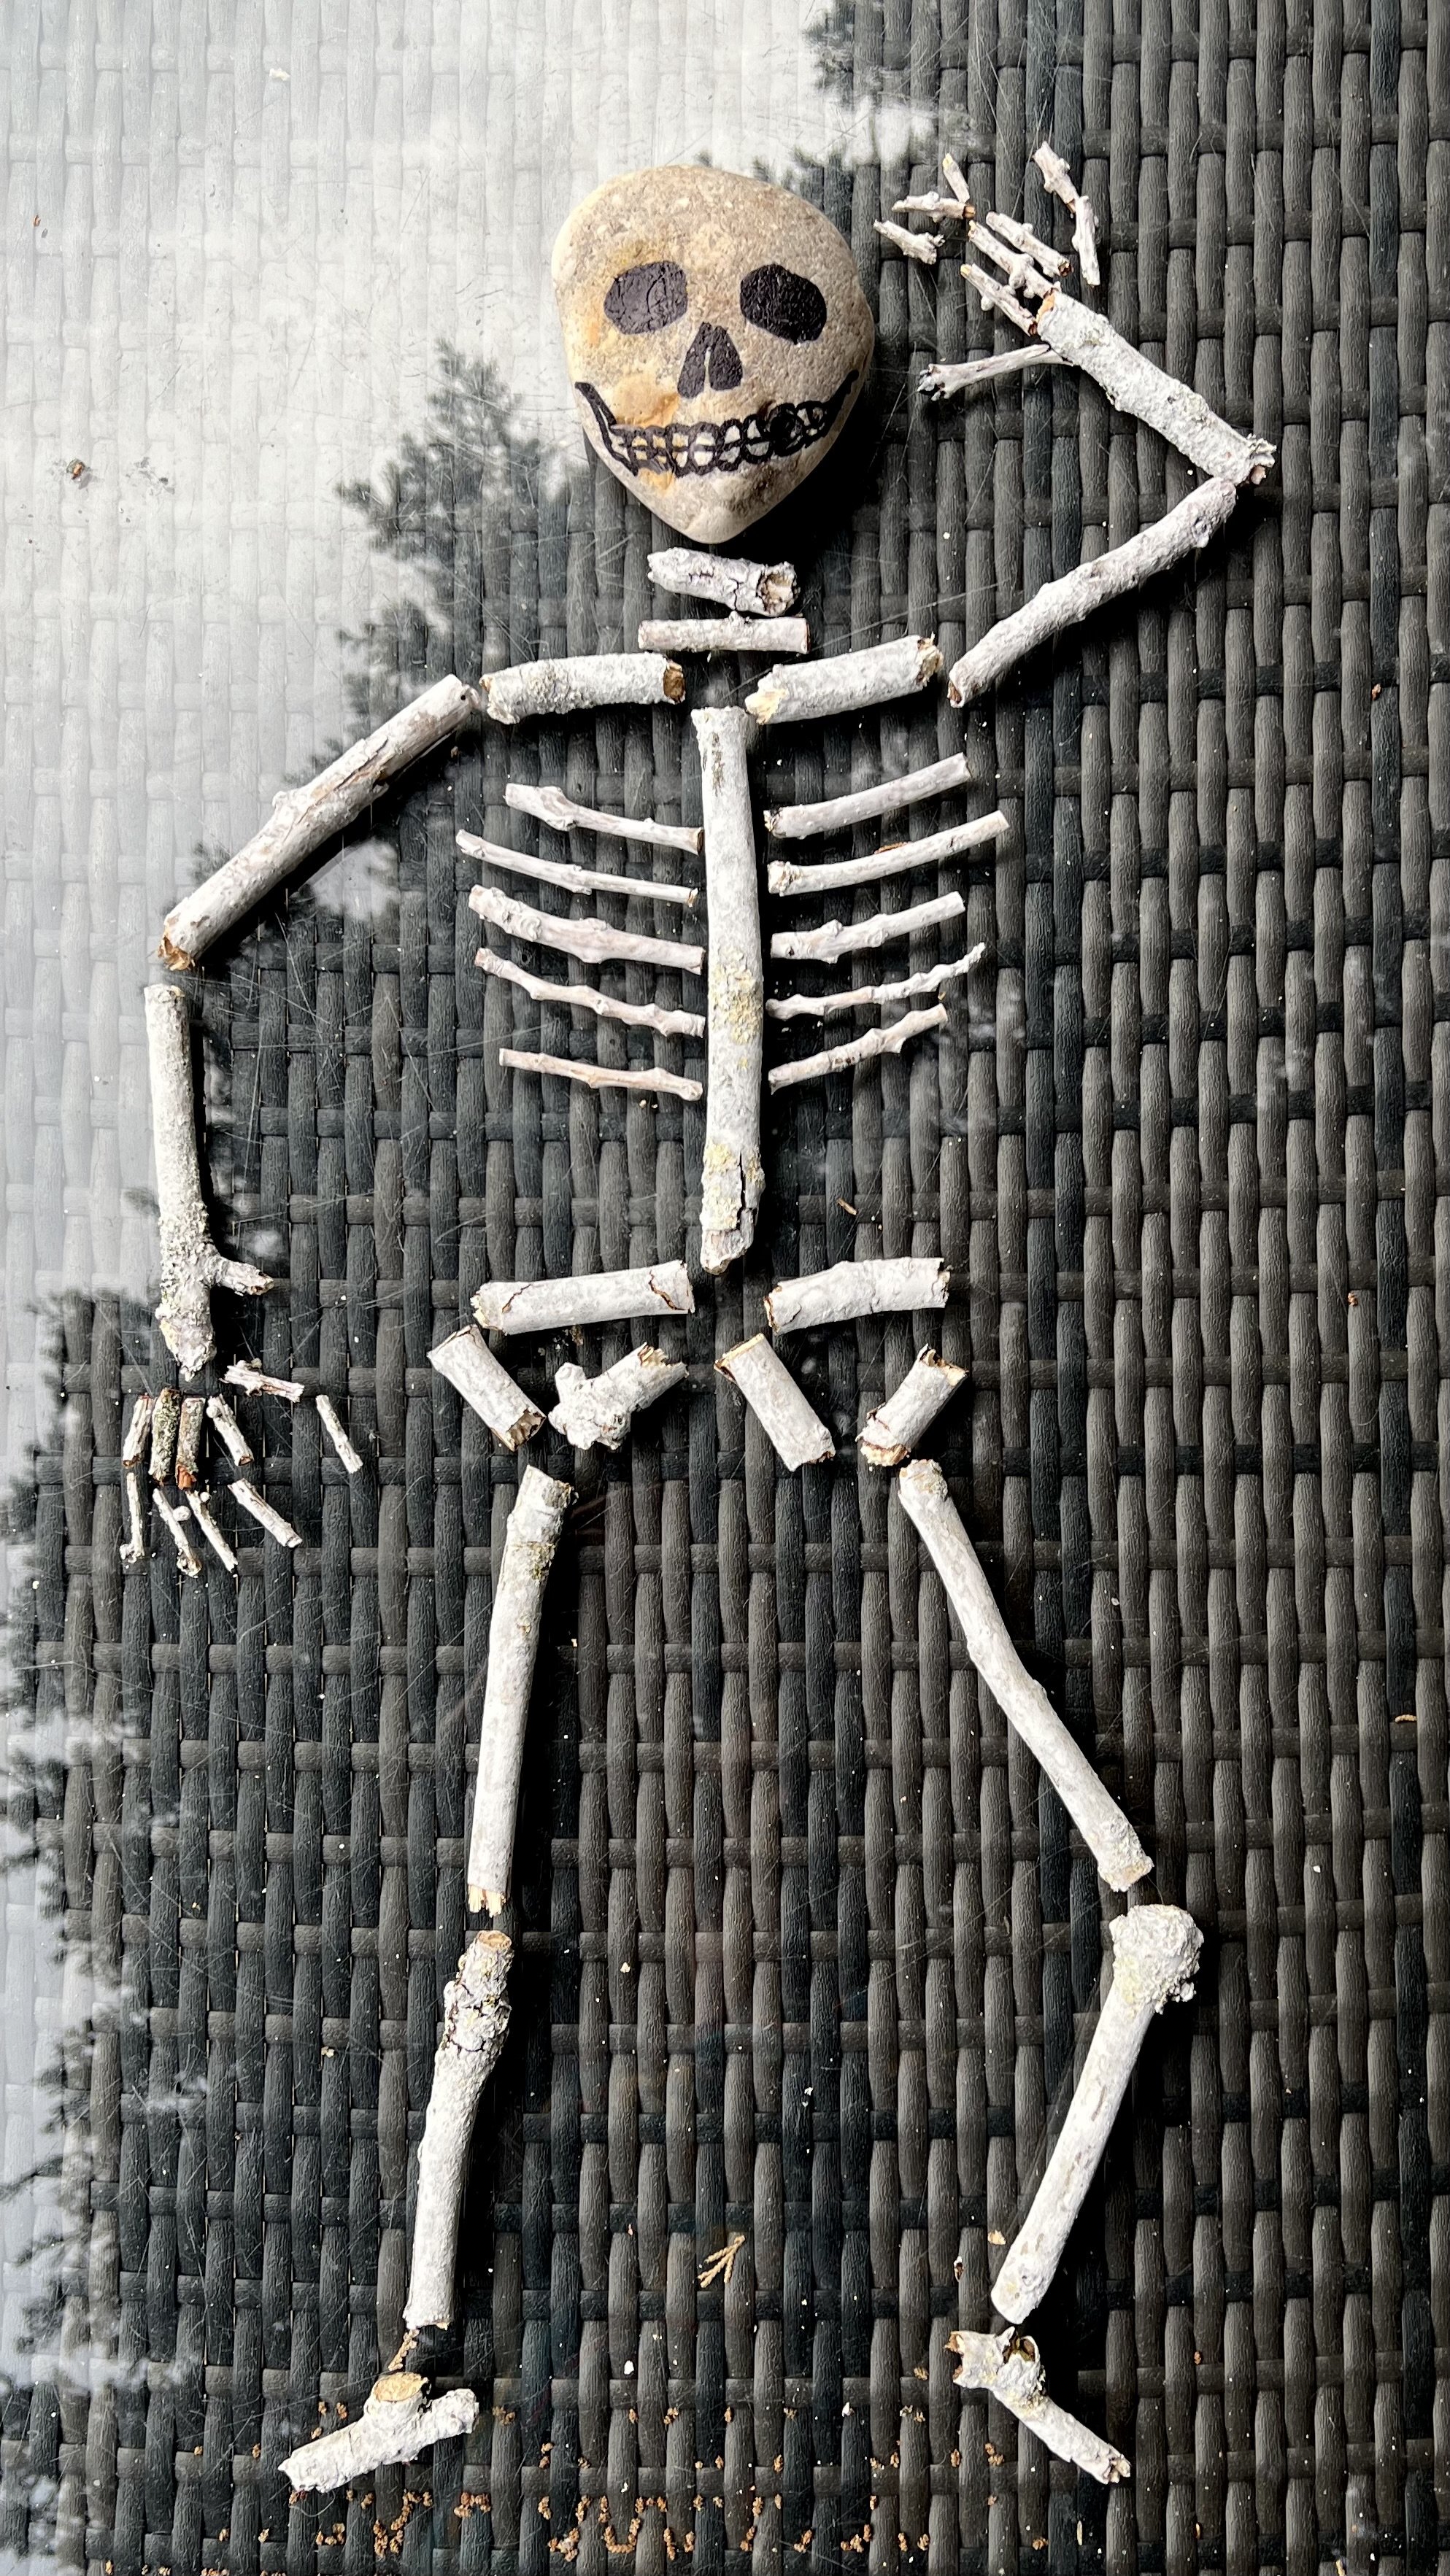
Craft The Bones
You can make bones that look real with simple sheets of foam or cardboard. Keep them light so the frame can hold them.
- Skull: stack foam board layers like a sandwich, glue, then carve with a utility knife. Shape eye sockets and cheekbones. Seal with a thin layer of paper mache for texture.
- Ribcage: cut two identical rib sets from foam board. Curve them by rolling over a tube. Connect to a sternum strip and tie to the frame with wire.
- Spine: wrap the PVC spine with thin foam strips. Add small clay bumps for vertebrae.
- Arms and legs: cut bone shapes from EVA foam or cardboard. Glue to the PVC or wire. Add slight bends for a natural look.
- Hands and feet: trace your hand for scale. Cut bones as simple shapes and glue to a palm and sole base.
If you own a 3D printer, you can print a skull and hands for extra detail. For kids’ builds, paper templates and tape work fine and are very safe.
Assembly And Joints
Strong joints make or break the prop. You want parts that can move but hold a pose.
- Hips and shoulders: use PVC tees. Add a short pipe as a “ball” and secure with a zip tie or a small bolt through the tee to limit flop.
- Elbows and knees: elbows work well. Add a drilled hole and a small bolt with a lock nut for tension.
- Wrists and ankles: wire or paracord through drilled holes works well. Tie tight, then seal the knot with hot glue.
- Neck: a short pipe with a coupler. Add foam shims inside for snug fit so the head turns but stays put.
My field fix: if a joint droops, wrap a rubber band under the bolt head before tightening. It adds friction without damage.
Paint And Aging Effects
Paint turns craft foam into bone. Keep it simple and fast.
- Base coat: spray off-white or bone. Let it dry fully.
- Wash: mix a little black or brown acrylic with water. Brush on, then wipe off. The color stays in cracks and looks like age.
- Dry brush: use a light cream paint with a nearly dry brush. Swipe edges to pop highlights.
- Grime and moss: dab coffee grounds in glue for texture. Add green wash near joints for a damp grave look.
- Sealer: use a matte clear coat. It protects paint outdoors.
Pro tip: hot glue makes great tendon strands. Stretch it between bones, then paint. It looks creepy at night.
Safe Lighting And Mounting
Lighting sells the scare. Safe power prevents mishaps.
- Use battery LED pucks in the ribcage or under the skull. They are cool to the touch and easy to hide.
- Ground stakes: slide the pelvis pipe onto rebar hammered into the soil. Zip tie the frame to a fence if wind is strong.
- Hanging mount: use a ceiling hook rated for the weight. Hang with fishing line for a floating effect.
- Weather tips: seal foam edges, bring the prop inside during storms, and keep lights rated for outdoor use.
Safety check: confirm cords are not a trip risk. Keep anything electrical away from wet grass or puddles.
Budget And Time Breakdown
Costs vary by size and material. Here is a realistic range and plan.
- Budget build: cardboard bones, wire frame, craft paint. Cost: about 20 to 40 dollars. Time: one weekend.
- Mid-tier build: PVC frame, foam bones, better paints, LEDs. Cost: about 50 to 100 dollars. Time: one to two weekends.
- Premium build: 3D printed skull and hands, detailed paint, motion sensor. Cost: 120 dollars and up. Time: spread over two to three weekends.
From my projects, the paint stage gives the best return on effort. A good wash and dry brush can make simple parts look pro.
Common Mistakes And How To Fix Them
A few small fixes can save the day.
- Floppy joints: add a bolt and lock nut or stack washers to increase friction.
- Top-heavy skull: lighten it by hollowing the foam, or add weight in the base.
- Flat ribs: curve foam by warming it with a hair dryer and bending it over a tube.
- Paint looks chalky: add a thin brown wash and seal with matte spray.
- Weak wrists and ankles: reinforce with wire loops and a drop of hot glue over knots.
I once rushed and skipped sealing edges. A light rain warped the ribs. Now I always seal and bring the display in during bad weather.
Care, Storage, And Reuse
Treat your skeleton well and it will last for years.
- Wipe dirt with a damp cloth and mild soap. Dry before storage.
- Remove LEDs and store batteries apart.
- Store indoors in a large trash bag or wardrobe box. Add bubble wrap for the skull and hands.
- In spring, check joints, tighten bolts, and touch up paint.
I label limbs by side with a marker. Reassembly is fast the next year.
Frequently Asked Questions
How Long Does It Take To Make A Full-Size Skeleton?
A simple version takes one weekend. A detailed build can take two weekends. Dry times for paint add a few hours.
What Is The Cheapest Way To Make One?
Use a wire frame and cardboard bones. Paint with craft acrylics. You can keep costs under 30 dollars.
Will It Survive Rain And Wind?
Yes, if you seal the paint and secure the frame to stakes or a wall. Bring it inside during heavy storms.
Is PVC Better Than Wire?
PVC is stronger and holds poses better for large builds. Wire works for small or hanging props.
Can Kids Help With The Build?
Yes. Let kids trace and cut paper templates, help with paint washes, and place LEDs. Adults should handle cutting, drilling, and hot glue.
How Do I Make The Skull Look Real?
Shape deep eye sockets and a clear jaw line. Use a dark wash in cracks and a light dry brush on edges. That contrast brings it to life.
Wrap-Up And Next Steps
You now know how to plan, frame, build, paint, and light a Halloween skeleton that looks bold and holds up outside. Keep it light, poseable, and sealed, and it will serve you year after year. Start small if you like, then add ribs, hands, and lighting once the base is steady.
Set a build date this weekend. Gather your materials list, print your plan, and make the first cut. Share your progress, ask questions, and swap tips in the comments. Want more guides, templates, and paint recipes? Subscribe for updates and new seasonal builds.
Disclosure: As an Amazon Associate, I may earn from qualifying purchases at no extra cost to you. Amazon and the Amazon logo are trademarks of Amazon.com, Inc, or its affiliates.
