
Modern cars rely on many sensors to keep engines running smoothly, and one of the most important is the MAF sensor (Mass Air Flow sensor). This small electronic device measures the amount of air entering your engine, helping your car’s computer decide how much fuel to inject. If the MAF sensor gets dirty, you might notice rough idling, bad fuel economy, hesitation, or even stalling. Many people think cleaning the MAF sensor requires removing it from the car, but that’s not always true. In fact, you can clean it effectively without taking it out, saving time and avoiding risks of damaging delicate parts.
Cleaning your MAF sensor without removing it can restore your engine’s performance and prevent expensive repairs. This guide will show you how, step by step. You’ll also learn what tools to use, common mistakes to avoid, and how to tell if your MAF sensor really needs cleaning.
Even if you’re not a car expert, you’ll find practical advice and insights most beginners miss.
What Is A Maf Sensor And Why Does It Get Dirty?
The MAF sensor sits between your car’s air filter and the intake manifold. It uses wires or a film to measure air flow. Over time, dust, oil, and even tiny insects can stick to these parts. This buildup changes the readings, causing your engine to get too much or too little fuel.
Most MAF sensors get dirty because:
- Air filters are not changed regularly
- You drive in dusty or polluted areas
- Engine oil vapors escape into the intake
When dirty, the sensor may send wrong signals. Your car’s check engine light might come on, and you’ll notice poor acceleration or strange engine sounds. Cleaning the sensor can fix these problems quickly.
Signs Your Maf Sensor Needs Cleaning
A dirty MAF sensor can cause different symptoms. Here are common signs:
- Poor fuel economy – You use more gas than before.
- Engine hesitation – The car stumbles or hesitates when you accelerate.
- Rough idle – The engine shakes or runs unevenly when stopped.
- Check engine light – The dashboard warning comes on.
- Hard starting – The engine is slow to start or doesn’t start at all.
Sometimes, you’ll see a mix of these problems. If you notice them, cleaning the MAF sensor is a smart first step before replacing expensive parts.
Tools And Materials Needed
Before cleaning, gather these items:
- MAF sensor cleaner spray (never use brake or carburetor cleaner)
- Screwdriver or socket set (only if you need to loosen clamps)
- Safety gloves and eye protection
- Soft brush or cotton swab (optional, for light dust near the sensor opening)
- Clean, lint-free cloth
Do not use household cleaners or compressed air. Only use a product labeled MAF sensor cleaner. These sprays dry fast and leave no residue.
Preparation Steps Before Cleaning
To clean your MAF sensor safely, follow these preparation steps:
- Turn off the engine and let it cool. Never spray cleaner into a hot engine.
- Disconnect the battery if you want extra safety, but this is optional.
- Locate the MAF sensor. It’s usually a small box or tube right after the air filter box.
- Inspect the sensor area for loose wires or clamps. Check the air filter. If it’s dirty, replace it first.
If you’re unsure, check your car’s manual or look for a diagram online. Taking a photo before starting helps you remember how everything fits.
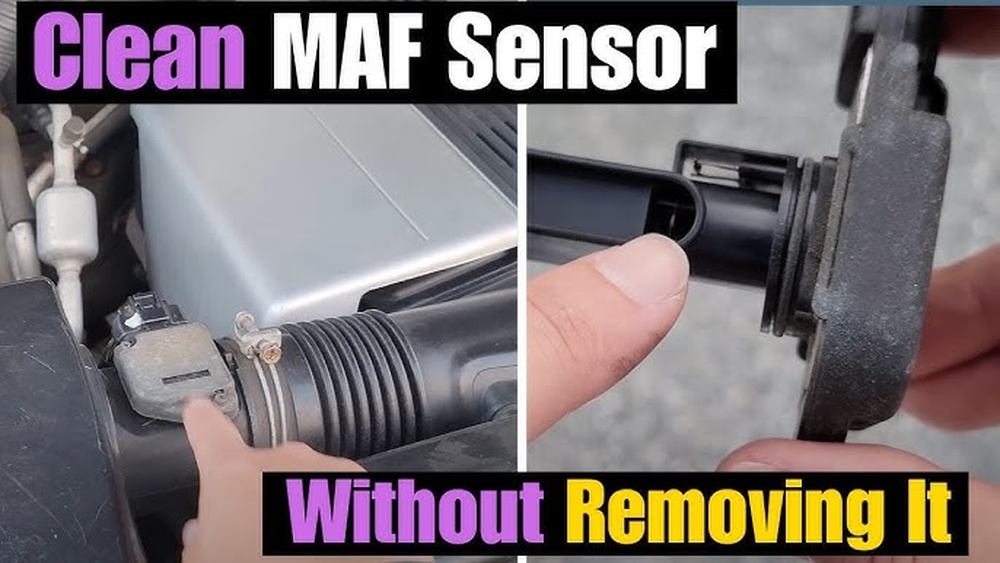
Step-by-step: Cleaning The Maf Sensor Without Removing It
You can clean the MAF sensor without removing it from the intake tube. Here’s how:
1. Expose The Sensor
Open the air filter housing. In most cars, you can do this by unclipping or unscrewing the air box cover. You want to see the sensor sitting in the airflow path.
2. Secure The Area
Place a clean cloth around the sensor to catch any drips. Make sure nothing falls into the intake.
3. Spray The Maf Cleaner
With the engine off, hold the MAF sensor cleaner about 10–15 cm (4–6 inches) from the sensor’s wires or film. Spray 10–15 short bursts directly onto the sensor element. Rotate the spray if needed to reach all sides.
Do not touch the sensor wires with fingers or tools—these parts are very delicate.
4. Let It Dry
Wait at least 10 minutes. The cleaner should completely evaporate. Do not start the engine until everything is dry.
5. Reassemble Everything
Close the air filter housing, making sure all clips and clamps are secure. Double-check that nothing is loose.
6. Test The Engine
Start the car and let it idle for a few minutes. Watch for the check engine light. In most cases, you’ll notice smoother running right away. If the light stays on, the sensor may need deeper cleaning, or there could be another problem.
Common Mistakes To Avoid
Many beginners make errors that can damage the MAF sensor or make cleaning useless. Here are mistakes to avoid:
- Using wrong cleaners like WD-40, brake cleaner, or compressed air
- Scrubbing or touching the sensor wire with tools or fingers
- Spraying too much cleaner, flooding the sensor
- Not letting the sensor dry fully before starting the engine
- Ignoring a dirty air filter, which will make the sensor dirty again
A non-obvious tip: Do not spray cleaner into the air filter or intake manifold. Focus only on the sensor area.

Credit: q20.co.za
How Cleaning Affects Your Car’s Performance
A clean MAF sensor improves:
- Fuel efficiency: The engine uses the right amount of fuel.
- Throttle response: Acceleration feels smoother and faster.
- Idle quality: The engine runs quietly at stoplights.
- Emissions: Fewer pollutants are released.
In some cases, you can gain back 5–10% of lost fuel economy after cleaning. That means real savings at the gas pump.
Here’s a comparison of symptoms before and after cleaning:
| Symptom | Before Cleaning | After Cleaning |
|---|---|---|
| Fuel Economy | Poor (decreases) | Improved (back to normal) |
| Engine Idle | Rough, shakes | Smooth, steady |
| Acceleration | Slow or hesitant | Quick, responsive |
| Check Engine Light | Often On | Usually Off |
How Often Should You Clean The Maf Sensor?
Most experts suggest cleaning the MAF sensor every 20,000 to 30,000 miles (32,000 to 48,000 km). If you drive in dusty or dirty areas, clean it more often.
Some cars may need cleaning sooner. For example, if you use oiled air filters or notice symptoms, check the sensor at every oil change.
Here’s a quick guide:
| Driving Condition | Recommended Cleaning Interval |
|---|---|
| Normal City/Highway | Every 30,000 miles |
| Dusty/Rural Roads | Every 15,000 miles |
| Oiled Air Filters Used | Every 10,000 miles |
Can You Always Clean The Sensor Without Removing It?
Most MAF sensors can be cleaned without removing them, but not all. Some are hidden inside the air tube or covered by protective mesh. In these cases, you may only be able to clean the exposed parts.
If the sensor is very dirty or you see oil or sticky residue, removal may be needed. But for light dust or normal buildup, non-removal cleaning works well.
A useful tip: Always start with non-removal cleaning. If symptoms don’t improve, then consider removing the sensor for deeper cleaning.
Risks And Precautions
Cleaning the MAF sensor is safe if you follow the steps. But there are risks:
- If you break the sensor wire, you’ll need a replacement (these can be expensive).
- Spraying too much cleaner into the intake may cause starting problems.
- Not letting the sensor dry can cause misfires.
To avoid problems:
- Use only MAF sensor cleaner
- Work in a well-ventilated area
- Wear safety gloves and goggles
- Never force parts or over-tighten screws
Cost Comparison: Diy Vs Professional Cleaning
How much can you save by cleaning your MAF sensor yourself? Here’s a simple comparison:
| Option | Cost (Approx.) | Time Needed |
|---|---|---|
| DIY Cleaning | $8–$15 (for cleaner) | 20–30 minutes |
| Professional Service | $50–$120 | 1–2 hours (including waiting) |
| New MAF Sensor | $70–$300+ | 1–2 hours (plus parts order) |
DIY cleaning is fast and cheap. Most people can do it with basic tools and no special skills.
When Cleaning Isn’t Enough
Sometimes, cleaning the MAF sensor doesn’t fix the problem. If you still have symptoms, check for:
- Faulty or broken sensor (needs replacement)
- Cracked intake hoses or vacuum leaks
- Damaged air filter or air box
- Wiring issues or corroded connectors
A professional mechanic can test the sensor with special tools. If the sensor fails, replacement is the only option.

Credit: www.crcindustries.com
Additional Tips Most People Miss
- Reset the engine computer: After cleaning, disconnect the battery for 10 minutes to reset the car’s computer. This helps clear any error codes caused by the dirty sensor.
- Check for updates: Some cars have updated software for MAF sensor problems. Ask your dealer or check online for technical service bulletins.
These details help avoid repeat problems and get the best results after cleaning.
Frequently Asked Questions
Can I Use Rubbing Alcohol Or Carb Cleaner Instead Of Maf Sensor Spray?
No. Only use MAF sensor cleaner. Other products can leave residue, damage coatings, or short-circuit the sensor. MAF cleaners are designed to evaporate quickly and not harm sensitive parts.
How Do I Know If The Cleaning Worked?
You should notice smoother idle, better acceleration, and improved fuel economy within a few drives. The check engine light may turn off by itself, or you might need to reset it. If symptoms stay, the sensor may be faulty.
Will Cleaning My Maf Sensor Fix The Check Engine Light?
If the light is caused by a dirty MAF sensor, cleaning can fix it. But if there are other problems (like vacuum leaks or damaged wires), the light may stay on. Scan your car for error codes if the light does not go away.
Is It Safe To Drive With A Dirty Maf Sensor?
It’s possible, but not recommended. A dirty MAF sensor can cause poor performance, higher emissions, and in some cases, engine stalling. Long-term driving can damage other parts, like the catalytic converter.
Where Can I Find More Information About Maf Sensors?
You can learn more from the Wikipedia page on Mass Flow Sensors, which covers sensor types, functions, and technical details.
Keeping your MAF sensor clean without removing it is one of the simplest ways to keep your engine running well. Regular cleaning saves money, prevents trouble, and gives you confidence every time you drive. With the right tools and a little care, anyone can do it at home.

Credit: q20.co.za
Disclosure: As an Amazon Associate, I may earn from qualifying purchases at no extra cost to you. Amazon and the Amazon logo are trademarks of Amazon.com, Inc, or its affiliates.
