
Want to enjoy creamy, frothy milk in your coffee but don’t have a frother? You’re not alone.
Many people think frothing milk is only possible with special machines, but that’s not true. You can create rich, velvety foam right at home using simple tools you already have. Imagine sipping your favorite café-style drink without leaving your kitchen.
Keep reading, and you’ll discover easy, quick ways to froth milk that will transform your coffee experience every time.

Credit: blog.davidstea.com
Why Froth Milk At Home
Frothing milk at home can make your coffee moments special. It adds a creamy texture and rich taste. You can enjoy café-style drinks without leaving your kitchen. Frothing milk yourself saves money and lets you control ingredients. It’s simple, quick, and satisfying.
Benefits Of Homemade Frothed Milk
Freshly frothed milk improves your coffee’s flavor and feel. It creates a smooth, velvety foam that lifts espresso shots. Making foam at home means no extra costs for coffee shops. You can choose your milk type and control sweetness and creaminess. Home frothing keeps your drinks natural and free of additives. It also lets you experiment with textures and temperatures.
Milk Types That Froth Best
Whole milk produces the richest, creamiest foam. Its fat content helps create smooth bubbles that last longer. Low-fat milk foams well but with lighter texture. Skim milk makes big, airy foam but can feel thin. Plant-based milks vary; oat milk froths nicely with creamy foam. Almond and soy milk can froth but may separate faster. Choose milk based on taste and froth style you like.
Simple Tools You Can Use
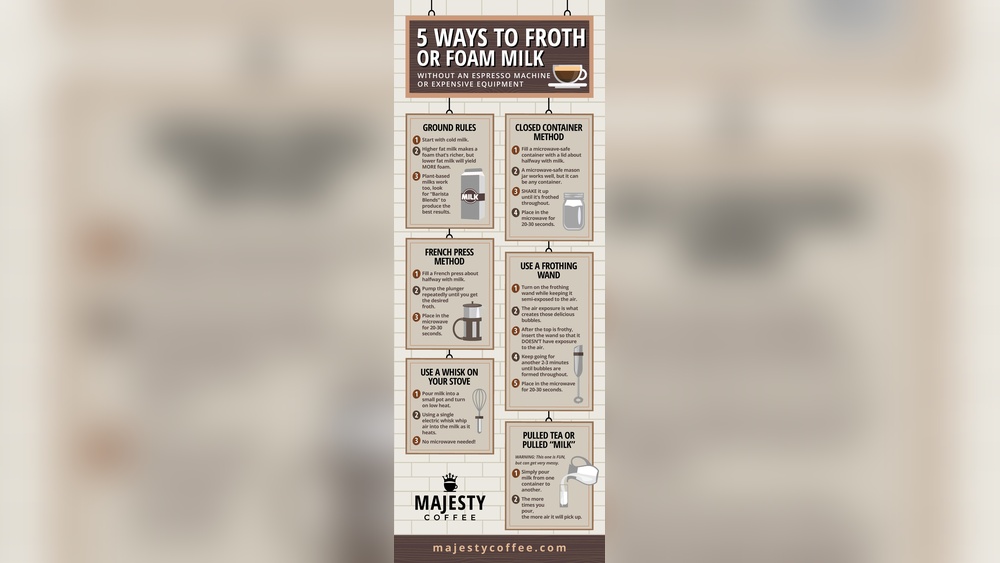
Frothing milk without a frother is easy using simple tools. Many common kitchen items can create smooth, creamy foam. These tools save money and space. They also work well for quick coffee or hot chocolate.
Each method uses a different tool but follows the same idea. Agitate the milk to add air and create bubbles. The result is a light, fluffy texture that improves any drink.
Using A Jar Or Bottle
Pour warm milk into a clean jar or bottle. Close the lid tightly. Shake the container vigorously for 30 seconds. The milk will froth inside the jar. Open carefully to avoid spills. Pour the foam on your coffee or drink.
Whisking By Hand
Heat milk until warm but not boiling. Use a small whisk and stir the milk quickly. Move the whisk up and down to add air. Whisk for about one minute until foam forms. The foam will be light and creamy. Pour gently over your beverage.
Electric Mixer Or Blender
Warm milk in a microwave or on the stove. Pour into a mixing bowl or blender container. Use a handheld mixer or blender on low speed. Blend for 20 to 30 seconds. The milk will become frothy and thick. Use immediately for best results.
Microwave And Spoon Method
Heat milk in a microwave-safe cup. Use a spoon to stir vigorously for one minute. Stirring adds air to the milk, creating foam. The foam will be less thick but still good. Spoon the foam onto your drink carefully.
Step-by-step Frothing Techniques
Frothing milk without a frother is easy with simple kitchen tools. These step-by-step techniques create creamy, fluffy milk foam for coffee or hot chocolate. Each method requires only basic items found in most homes.
Preparing The Milk
Choose fresh milk for best results. Whole milk creates thicker foam. Pour cold milk into a clean container. Use about half a cup for one drink. Avoid overfilling to leave room for foam.
Creating Foam With A Jar
Pour milk into a jar with a tight lid. Close the jar securely. Shake the jar vigorously for 30 to 60 seconds. Watch the milk expand and turn frothy. Warm the jar in hot water to keep foam warm.
Whisking To Create Froth
Heat milk slightly before whisking. Use a hand whisk or balloon whisk. Whisk milk quickly in a circular motion. Continue until foam forms on top. Stop when foam doubles in volume.
Blending For Creamy Foam
Pour milk into a blender or immersion blender cup. Blend at medium speed for 30 seconds. The milk will become thick and frothy. Avoid blending too long to prevent splashing.
Heating And Frothing With A Spoon
Heat milk gently on the stove or microwave. Stir milk vigorously with a large spoon. Lift the spoon while stirring to create bubbles. Keep stirring until foam forms on top.

Credit: www.youtube.com
Tips For Better Froth
Creating smooth, creamy milk froth without a frother can be simple. Small tricks help make better froth at home. Follow these tips to improve your milk frothing skills and enjoy café-style drinks anytime.
Ideal Milk Temperature
Heat milk to about 140°F to 150°F for best froth. Warmer milk froths easier and holds bubbles well. Avoid boiling milk as it can taste burnt. Use a kitchen thermometer or warm it until hot but not scalding.
Avoiding Large Bubbles
Large bubbles make froth less smooth. To get small bubbles, use quick, short motions when whisking or shaking milk. Tap the container gently on the counter after frothing. This breaks big bubbles and creates creamy texture.
Cleaning And Maintenance
Clean all tools right after use to stop milk buildup. Milk residue can spoil froth quality and taste. Use warm soapy water and rinse well. Dry tools completely before next use to keep them in good shape.
Creative Uses For Frothed Milk
Frothed milk is more than just a coffee topping. It adds a soft, creamy texture to drinks and treats. Learning to froth milk without a frother opens many possibilities. This simple skill can make your homemade beverages and desserts feel special.
Explore creative ways to use frothed milk. Bring a café touch to your kitchen. Enjoy rich flavors and smooth textures with easy techniques.
Lattes And Cappuccinos At Home
Create lattes and cappuccinos using frothed milk made by hand. Pour warm, foamy milk over strong coffee or espresso. The froth adds a light, creamy layer on top. It makes simple coffee taste fancy and comforting.
Use a jar or whisk to froth milk quickly. This method saves money and space. Enjoy your favorite coffee drinks anytime without extra gadgets.
Frothed Milk In Desserts
Frothed milk can enhance many desserts. Add it to puddings, custards, or mousse for extra creaminess. The airy texture blends well with sweet flavors.
Try topping cakes or pies with a spoonful of frothed milk. It adds a light, soft finish. This simple touch makes desserts look and taste better.
Adding Flavors To Your Froth
Mix flavors into your frothed milk for variety. Vanilla, cinnamon, or cocoa powder work well. Stir gently to keep the froth fluffy.
Flavored froth adds a new taste to coffee or desserts. Customize your drinks to match your mood. Small changes make a big difference in flavor.

Credit: blog.davidstea.com
Frequently Asked Questions
How Can I Froth Milk Without A Frother?
You can froth milk by shaking it in a jar, whisking vigorously, or using a French press. Heat the milk first for better foam. These methods create creamy froth without special tools, perfect for lattes or cappuccinos.
What Type Of Milk Froths Best Without A Frother?
Whole milk froths best due to its higher fat content. However, 2% and skim milk also work well. Non-dairy options like oat or almond milk froth but may produce less stable foam.
Can I Froth Milk Using A Microwave And A Jar?
Yes, heat milk in a microwave-safe jar, then shake it vigorously with the lid on. This method quickly creates frothy milk without extra equipment, ideal for home use.
How Long Should I Shake Milk To Froth It Properly?
Shake the milk vigorously for 30 to 60 seconds. Stop when the milk doubles in volume and forms a creamy foam. Avoid over-shaking to prevent spilling.
Conclusion
Frothing milk without a frother is simple and fun. You can use tools like a jar, whisk, or microwave to create foam. Practice makes perfect, so don’t worry if it isn’t great at first. Enjoy your creamy drinks anytime, without extra gadgets.
This easy method saves money and space in your kitchen. Try different milks and temperatures to find your favorite. Frothing milk at home adds a cozy touch to coffee or hot chocolate. Give it a try and enjoy your tasty, frothy drinks today!
Disclosure: As an Amazon Associate, I may earn from qualifying purchases at no extra cost to you. Amazon and the Amazon logo are trademarks of Amazon.com, Inc, or its affiliates.
